Showing posts with label turkey. Show all posts

Sunday, November 18, 2012

Sausage, in a Bird, in a Bird, in a Bird, in a Bird.... Layered with Sausage.....

Sausage, in a Bird, in a Bird, in a Bird, in a Bird.... Layered with Sausage.....


OK, so we have all either saw the infamous Turduckhen displayed in specialty foods catalogs ( http://www.cabelas.com/entrees-cabelas-tur-duc-hen.shtml ) around the holidays, or saw Epic Meal Time's Turbaconepic ( http://www.youtube.com/watch?v=7Xc5wIpUenQ ) ..... either way it has caused lust amongst us food lovers.... So, for this Thanksgiving I have decided to forego my traditional Smoked Turkey for something a little more adventurous. I decided to take two different types of animals and a few species and meld them in a deliciously unholy way that will only cement my room in the depths of hell...

I decided to take delicious sausage, and stuff a delicious cornish game hen with it. Then stuff the corning game hen into a chicken. Then stuff the chicken into a duck. Then stuff the duck into the turkey. Then smoke it with wood chips made from the casks that they age Jim Beam bourbon in.  
( http://www.amazon.com/Beam-BTJB48-Smoking-Bisquettes-Count/dp/B001HZXYCI/ref=sr_1_10?ie=UTF8&qid=1353296649&sr=8-10&keywords=bradley+smoker+bisquettes )
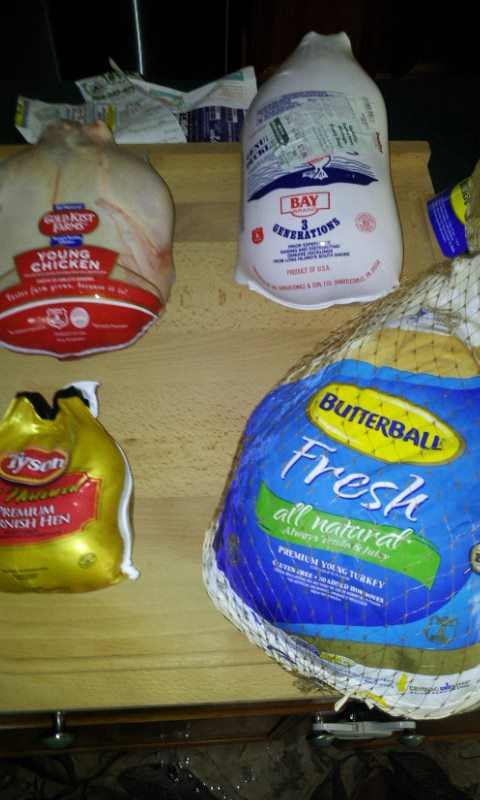

Up to no good.......
Before I go any further, let it be known that this project will take a few hours to prep before you even get it to the smoker, and you have to have some serious knife skills to pull this off. I would recommend if you do not have the aforementioned knife skills either have the butcher debone your birds for you, order a Turduckhen from Cabela's, have an ambulance waiting in your driveway for the inevitable (and unenviable) trip to the hospital to have your forearm reattached, or just skip this project altogether. I am a guy who has a degree in culinary arts and ran some big ass kitchens in my day, and this was a pain in the ass challenging task. 

I would plan on par cooking the bird a few days before your meal, then reheating and glazing in the oven the day of the meal. Because of all of the layers involved, this one will be a difficult one to time with the rest of your meal, and you don't want anyone to get sick from undercooked poultry.  


So, what you will need for this:


2 lbs Sage Pork Sausage (or some other non-breakfast sausage that you like. I would imagine chorizo, andouille, or even kielbasa would be good in this.... or bacon if you are into Internet memes)
1 - Partially Deboned Turkey (12 lbs, leg bones and wings left intact, innner bones and backbone removed)
1 - Fully Deboned Duck (5-6 lbs, no bones at all, leg meat intact)
1 - Fully Deboned Chicken (4-5 lbs, no bones at all, leg meat intact)
1 - Fully Deboned Cornish Game Hen (1-2 lbs typically, again, no bones)
1 lb Bread Stuffing Mix (homemade or store bought, whatever you like)
2-3 oz. Cabela's Roasted Garlic and Beer Seasoning
2 - 4 cups of chicken stock
2 - Jumbo Eggs


Tools:

1 -SHARP 6" Boning Knife
1- Large Skillet
1 - Large Cutting Board with something to keep it from sliding (wet towel laid under it works fine)
Butcher's Twine
3 Half Bakers Sheets (or 3 large cookie trays)
Calibrated Stick Thermometer


Method:


How NOT to do this.....
1. Thaw and debone your birds. You can do this by brining it for a couple of days in the fridge, buying them fresh or thawed, or just letting your frozen birds sit in the fridge for a few days. You can choose to remove the skin from everything except the Turkey. I took the skin off of the game hen and chicken, and trimmed the duck fat liberally. IF YOU DON'T KNOW HOW TO DEBONE A BIRD, DON'T ATTEMPT THIS PART!!!! HAVE A BUTCHER DO IT FOR YOU!!!!

2. Once your birds are thawed, seasoned, and boneless, start making your stuffing. Cook off your two pounds of sausage in a large skillet. Once browned, add 2 cups of your chicken stock to deglaze the pan. Add in your dry stuffing mix. Stir until all of the moisture is absorbed. The stuffing mix needs to be rather moist and sticky, yet retain a ball shape. Add more chicken stock or cook a little bit uncovered to adjust the stickiness. Think Sushi Rice..... Let it cook off a bit until warm, but not too hot to touch. 

3. Add your eggs, ONE AT A TIME, to you warm stuffing stirring as you go. This will help stiffen your stuffing once it is cooked to make for a nice presentation. 

4. Take two long pieces (about 2-3 feet depending on your knotting skills) across the center of one of your baking sheets in an X shape.

5. Take a baseball sized bit of stuffing and roll it into a tight ball and place it in the middle of your tray with the butchers twine laid across it, right on top of the twine. 

6. Take your boneless Cornish Game Hen, and lay it over top of the stuffing ball, being careful to tuck in the edges. 

7. Layer about 1/4 inch of stuffing on top of the Cornish Game Hen. Smooth it out so it covers the bird entirely. 

8. Place your Chicken over top of the Cornish Game Hen being careful to tuck in the edges. Layer it with 1/4 inch of stuffing.

9. Place your Duck over your Chicken being careful to tuck in the edges. Layer it with 1/4 inch of stuffing.

10. Place your Turkey over your Duck being careful to tuck in the edges. Take your butchers twine and tie them firmly in an X shape. Don't tie it so tight it squeezes your stuffed birds out. This is a temporary tie and will be removed in the coming steps.

11. Place another baking sheet on top of your birds and gingerly flip it so it is breast side down. 

12. Commence tying a butcher's the length of the bird. I found it best to have 4 segments, on in the front in front of the wings, two in the middle, and one in the back, using the tails to truss the legs together. To maximize my easily sliced portion, I tied it in such a way that it looks like a long turkey. 

12a. Paula Deen has an alternative method for this that uses several metal skewers run through the bottom of the turkey, parallel to one another, perpendicular to the backbone, then lacing it up like a sneaker. I attempted this, but found the Turkey skin too weak for this to work effectively. 

13. Flip the bird gingerly back over onto either your smoker rack or the sheet you will bake it on. 

14. Generously season your bird with the Cabela's spice (or whatever you like)


Baking:

If baking, place the bird into an oven preheated to 500 degrees. Allow it to roast for 15 - 20 minutes. Turn the oven down to about 275 degrees and let it finish low and slow. If you get impatient and cook at too high a temperature, the eggs in your stuffing will leaven and force the whole thing apart. Take your time. Expect to roast it 3-5 hours depending on final weight.
Awww Yea.... The Bradley Smoker...

Smoking:

Smoke the bird until the internal temp reaches 155 degrees, which will take about 5-8 hours at 200 degrees. Hickory, Cherry, and Mesquite work well for poultry. If you have a Bradley smoker, I would recommend the Jim Beam smoking pucks. 

Once Par Cooked, place the bird on a cooling rack on top of a bakers sheet. Allow it to rest at room temperature for 20 minutes or so, then transfer to the fridge once it is cool to the touch. Cover it loosely with foil to allow air to circulate. 


Reheating:

To reheat this bird, place in a roasting pan with a rack. Put about 2-3 cups of Chicken Stock in the bottom, cover loosely, and place into the oven. Baste often with butter or garlic oil. Once the internal temp get to about 130, take it out of the oven, pour off the chicken stock, and turn the oven to 375 degrees. Baste with Butter or Garlic Oil and the skin should become golden brown. If the temperature gets to 145 degrees or higher and the skin has not crisped up, put the bird on the middle low rack and use the broiler. MAKE SURE YOU WATCH IT CAREFULLY!!! FAT IS FLAMMABLE!!!

Once the skin looks the way you want it to, remove it from the oven and allow it to rest for about 20 minutes. Slice and eat with gravy or the Roasted Shallot Sauce mentioned in an earlier post.


Saturday, November 27, 2010

Turkey Day Epiphany......Grill Roasted Turkey and Roasted Shallot-Red Wine Sauce


Greetings All,

So, Thanksgiving 2010 has come and gone, and I hope all 2 of you regular readers out there had a wonderful and culinarily successful holiday. For me, I decided to go out on a limb and deviate from my tried and true, perfect EVERY TIME turkey recipe and rather than roast by bird in the oven, I decided to break out the Weber Genesis and give it a whirl on there. Bolstered by my past successes with Prime Rib, Pork Tenderloins, and other big ass chunks of mammal, I thought it a great idea to try it with some avian fare for a change. After pondering it for a few days, I thought I had a good plan; stick with my usual turkey routine and just put it on the grill instead of in the oven. So, at 10:00 am on Thanksgiving, I pulled the grill out of the garage, gave her a good once over with the wire brush and started her up. She got nice and hot, I threw the bird and the giblets on the grill, backed it off to medium heat, and smugly went inside relishing in my culinary brilliance. I began crafting my gravy, preparing it for the neck and giblets lovingly roasting on the grill, added the wine to simmer and decided to go grab the gravy goodies from the grill.

Never in my life would I have ever imagined an ENTIRE 25 pound turkey.... ON FIRE....... Yup, the whole damn thing looked like a torch from an Indiana Jones movie. Luckily, having just removed it from the brine not 20 minutes before, I still had my bucketful of brine near the grill, so I quickly dunked it into the salty water and heard a satisfying hiss as my turkey stopped trying to roast itself. Realizing my error through my bourbon induced haze (not always smart to start drinking when you get up on a holiday simply because you CAN), I left the center burner on (a no no when roasting on the grill) and also neglected to put foil under the bird (another no no with high fat items). So I corrected my mistakes, turned the center burner off and got me some foil. I somehow managed to get the turkey out of the brine without looking at it, and was pleasantly surprised to see that the bird was not in the least bit black; the super salty brine lifted almost all the carbon from skin of the bird, just like I pushed the factory reset button in the turkey's cavity. So, I began anew with the grill set correctly and some foil to catch the excess fat, and life was once again on track. I had my doubts the first hour or so of roasting, but glad I had the fortitude to stay the course, as the bird turned out more beautifully than ever before, and was easily the best one I have EVER made. The meat was a little bit smokey, well seasoned from the brine, and very juicy. SO, should you decide to do your turkey on the grill, remember a little foil will save your ass, and not to get it too hot... I kept mine steadily between 300 and 350 degrees, and the 25 lb bird took about 3.5 hours to cook thoroughly, basting every 30 minutes with my usual garlic oil.

My second adventure for the holiday was to deviate from the standard pan-dripping gravy that everyone does for the holidays, since I didn't have a pan in which to catch said drippings with my bird being on the grill and all. SO, I decided to scrounge around and see what I had laying around the house and come up with something from that. I had about 10 shallots, a 2 year old bottle of Beaujolais Nouveau, some beef stock and some chicken stock, as well as the grilled neck and giblets from the turkey. So, I decided with these ingredients I was going to make a masterpiece. I peeled my shallots and tossed them whole in the oven with a little oil, made a sauce base with a little garlic and 2 cups of the wine, and started a nice reduction while the shallots roasted. Once golden brown and sweet, I chopped up the shallots and tossed them in the reduction along with the neck and giblets, and let it simmer for another hour. On a whim, I tossed in a few leaves of fresh savory from the herb garden, thickened it up, and mounted with with 4 tablespoons of butter (it was a big batch of sauce) and seasoned it up with salt and pepper.

The sauce was AMAZING! It had a nice toasty sweet flavor balanced nicely with full body of the wine and concentrated stock, accentuated by the smoothness of the butter that was stirred in at the end. The sauce went perfectly with the turkey, playing off of the smokiness and garlic of the turkey just enough to make your taste buds sing. OK, I lose a man card for that description, but it was awesome nonetheless.

Since it was a sauce on a whim, I didn't really write anything down, but I will estimate below as well as I can. Post up if you have specific questions. Oh, and if you like what you read and cook, please follow my blog, as there will be much more to come!

Roasted Shallot - Red Wine Sauce


2 Tablespoons Fresh Garlic, chopped
1 Tbsp Olive Oil
2 cups Beaujolais Nouveau wine (or any red wine you like)
4 cups Chicken Stock
4 cups Beef Stock
1 Tbsp Chicken Base or Bouillon
Turkey neck and giblets
10 shallots, whole roasted then rough chopped (medium to large size pieces)
10 leaves of fresh Savory, chopped
2 Tbsp whole butter (used for mounting the sauce after thickening)

Basically for this recipe I just went by gut. I sauteed the garlic a bit, then added the wine. Added the neck and giblets. Reduced the wine by one half (half the wine was left), added the stock, reduced by half again. I stirred in the bouillon, and let it simmer. After about 45 minutes, I added the shallots and savory and let it cook for another 45 minutes to 1 hour. I brought the sauce back to a boil, thickened it with corn starch and water, and let it cook another 15 minutes to let the cornstarch cook. I shut it off and let it cool for about 10 minutes, then stirred the butter into the warm sauce. The butter should melt slowly as you stir, which adds richness to the sauce. Once the butter is melted and stirred in, the sauce is ready to serve.

Tuesday, October 12, 2010

A Little Piece of Heaven..... Chocolate Croissant Bread Pudding


Greetings All, 
So, it has been a little longer than I had hoped since I last wrote, but it has been a crazy few weeks. Running around like a madman always makes me yearn for comfort food, and I have had this delectable concoction rolling around in my head for days now. This is an interesting little twist on a typical "Grandma's" style comfort food; I remember going to my Grammy's house on chilly fall days and getting warmed up with a hunk of her nice warm Bread Pudding with raisins, cinnamon, and caramel. It was a terrific treat that always made me look forward to crisp fall Saturday mornings. This version, however, is NOT my Grammy's... it is a lot creamier, more sophisticated, but equally as desirable. Croissants make an excellent base for this pudding, as they "meld" much nicer with the custard than your typical rolls or bread used for pudding. This creamy sweetness paired with the rich, sweet, and slightly bitter Belgian chocolate makes the perfect ending to any meal, the perfect start to any day, AND the perfect sweet morsel for an afternoon pick-me-up. 

This is a very versatile pudding; can be served hot or cold, in large bowls with Vanilla ice cream or chilled and cut up into bite size morsels; can be a dessert or a part of a holiday breakfast or bunch with a richly roasted coffee. The nice thing about this is that it can be made several days in advance, then eaten chilled or just popped in the microwave for 45 seconds to warm it up. 

The chocolate for this recipe is very important, as you need something that can stand up to being in the oven for a long while. I HIGHLY recommend a high quality chocolate, such as Callebaut or Ghirardelli(available in most grocery stores), but if you can find the big chunks of block chocolate found in bins at a candy store or candy aisle at the grocery store that will work well too. Avoid chocolate chips, as they are too small and won't do well in the oven. I hate to be a stickler on this, but in this case you will REALLY see a difference. I tried many types and sizes of chocolate, but only the chunks really worked well. Chips tend to melt and dissolve into the custard, making a chocolate custard with no delicious contrast.

Anyway, enough of my ramblings.... On to the recipe!!!

Chocolate Croissant Bread Pudding

Tools-
1 - Large Mixing Bowl
1 - Balloon Whisk
1 - 12 X 20 X 2" Hotel Pan (or 2 9 X 13" pans)
1 - Cutting Board
1 - 8" (or larger) Chef's Knife
1 - Sauce Pan
1 - Wooden Spoon

 Custard-

 Milk - 2 qts
 Heavy Cream - 2 cups
 Sugar - 3 cups
 Whole Eggs (large) 10 each
 Egg Yolks 8 each    (you can save the whites for meringue if you want a sticky sweet topping :) )
 Pure Vanilla Extract -  2TBSP (or as much as you like)

 Croissants - This really depends on the size of them... I just cut them up
 into big chunks, enough to fill a hotel pan about 2/3 of the way.... You can
 buy frozen ones, its okay :)

 Belgian Chocolate (Callebaut brand is the best... Needs to be a harder
 chocolate, hersheys doesn't cut it) - I would say about 1.5 - 2 lbs, but
 really as much as you like... Cut it into random big chunks the size of a
 quarter using a big chef's knife....

 1. Heat 1/2 of the milk just enough to dissolve the sugar (scalded is
 perfect)
 2. Beat the Eggs and the Yolks together just enough to incorporate them
 together, then add the cold milk and heavy cream
 3. Add the warm milk to the mixture and mix well.

 ** This mixture can be made and kept on hand for a few days, so if you
 are having a party, make the mix ahead of time

 To Bake:
 1. Preheat oven to 250* (convection) or 275* (standard)
 2. Put the croissants into a full hotel pan, pour custard over the top.
 It
 should mostly cover the croissants but not so they are swimming....
 3. Let stand 30 minutes ( this breaks down the croissants a bit and
 makes it
 creamier)
 4. Add the chocolate to the top, just drop it all over the place.... Get
 that chocolate dust from cutting it on there too... It only makes it
 better
 5. Bake until the custard sets, about 30 minutes to 1 hour (depending on
 how
 thick the pudding is)
 6. Let it chill (you can eat it hot if you want, but I am a firm
 believer in
 letting a custard cool to remove excess water to concentrate the
 flavors. If
 you want it warm you can always pop it in the microwave for a couple
 seconds)
 7. Cut. Eat. Smile. Fall Asleep knowing your life is now perfect.....

Tuesday, September 21, 2010

Holiday Feasting Continued.... Orange Glazed Grilled Carrots

The Carrots of Awesomeness!!
Greetings All,
This side dish came about to help me combat that age old problem of holiday feasts at home.... OVEN SPACE!!! Anyone who has made a Thanksgiving dinner can attest that oven space is at a premium, with the bread stuffing, the potato stuffing, the green bean casserole, the turkey, the pumpkin pie, and on and on and on..... Now, with a little bit of planning, you can avoid stacking your oven to the hilt to make sure everything is hot at the same time, and this side dish is a direct result of that planning. These carrots can be blanched (boiled for a couple of minutes, then dunked in ice water) a day or two before and left to soak in the marinade/glaze. So when it comes to getting the food done, you just toss these guys on the grill a few minutes before dinner, and BAM! An awesome side dish that everyone will rave about.

The idea originally came from the Weber Grills Holiday Recipe emails that their corporate chef, Jamie Purviance, lovingly crafts and send out around the holidays. Even if you don't have a Weber grill, go to their site and sign up for their recipes; Chef Purviance is an undisputed master of the grill, and his recipes are always simple, tasty, and easy to prepare. These Orange Glazed Carrots combine the flavors of honey and orange with the zing of a splash of balsamic vinegar, and after a few minutes on the grill the glaze thickens a bit and becomes a little gooey, much like a good barbecue sauce would.

So, on to the recipe!

This recipe will serve 4 to 6 people a healthy portion, and it multiplies easily in case you have the whole family over. It takes about 20 minutes to prepare beforehand, and takes less than 10 minutes on the grill.

Tools:
Vegetable Peeler
Large Bowl or Stock Pot (8 quart works nicely)
Balloon Whisk
Metal Tongs (to take the carrots out of the water)
Zester
Pot for boiling water (8 quart stock pot works nicely)
1 Big Zip Loc bag, big enough to hold your carrots OR a cake pan large enough to lay them in.

You will need:
Ice
Water
 Kosher Salt
12 medium carrots (6-8 inches long, about 1 inch across at the stem), peeled
3 Tablespoons Unsalted Butter, melted
2 Tablespoons Honey
2 teaspoons Orange Zest (that is the orange part of the rind, more about this later)
2 teaspoons Balsamic Vinegar
2 Tablespoons chopped Parsley

To begin:
1. Put a pot of water on to boil with 2 Tablespoons of Kosher Salt, enough to cover 6 of the carrots at a time.
2. Prepare an ice bath (1 part water to 1 part ice) in a large bowl or stock pot. It is a good idea to have extra ice on hand to add if you are multiplying this recipe for more guests.
3. Once the water is at a rolling boil, place 6 of the carrots into the water. Cook the carrots for 2 - 4 minutes, or until the carrots are tender. You should be able to bend them a little bit without them breaking. Remember that we are going to cook them again, so we would rather UNDERCOOK them at this point than overcook them.
4. IMMEDIATELY plunge the carrots into the ice water. This will stop the cooking process so they stay at the doneness you like. Also, it will activate the pigments in the carrots, turning them bright orange, making them very fresh looking.
5. Once the carrots are cold, remove them from the ice bath and pat them dry. Place them into your Zip Loc
6. Repeat steps 3, 4, and 5 for the other half of the carrots.

Making the Glaze:
1. Combine 1/4 teaspoon of salt, honey, orange zest, and vinegar in a bowl. Gently whisk until well combined.
2. Make sure the butter is melted completely, and whisking the first mixture vigorously, add the butter SLOWLY to the mix. As you whisk, the butter will emulsify with the other mix, slightly thickening it. There should be little or no separation when you are done whisking.
3. Pour the mixture into the bag with the carrots, rolling them around gently to ensure they get evenly coated. (you will want to repeat this every so often until its time to grill them so the carrots absorb as much of that flavor as possible)
4. Place the bag into the fridge until it is time to cook them. As they cool, the butter will separate a bit from the mixture, but don't worry about it. This can be done the day before and left until right before serving.

Turning out:
1. Preheat your grill to about 400 degrees (medium heat, all burners set about halfway)
2. About 10 minutes before you are ready to eat, place the carrots on the grill perpendicular to the grates (this keeps them from falling through or sticking too hard on the surface)
3. Grill the carrots for about 5 minutes, or until they reach the doneness you prefer (personally, I like 'em a little crunchier)
4. Place on serving plate, pour the remaining glaze out of the bag onto the carrots, and garnish with the parsley. If you are feeling spunky, the orange that you removed the zest from could be segmented and diced and sprinkled on top as well.
5. NOM NOM NOM NOM

A few other things.........


Using a zester:
A zester is a tool that is made to remove only the very thin outer layer of skin from citrus fruits, where the color is. This thin layer holds much of the fruits volatile oils and thus provides an intense flavor. The white portion of the rind is very bitter, even more so when it is cooked, so avoid the white as much as possible. A zester looks like this:


Or, like this:


Personally, I use a microplane grater/zester for this because honestly, hand zesters are a pain in the butt. You have to hold the fruit tightly and forge the rounded ends into the zest and drag it away, and you can cut yourself if you are not careful. The Microplane works just like a grater; a few zips of the fruit down the side of this thing, and you are off to the races!

Monday, September 20, 2010

How To Roast a Perfect Turkey

The Perfect Bird

How to Cook the Perfect Holiday Turkey


Greetings All!


This is a blog about food.... simple, perfect, and delicious. My inspiration to begin blogging came from something near and dear to almost every American, that hallowed centerpiece of holiday gatherings, the turkey. How often have you been at a family holiday sitting at the table quaffing beverages to get the dry, overcooked turkey down, or been the bewildered cook staring questionably at a frozen bird? All too often at my own holiday gatherings I have fallen victim to awful turkey; a pale skin, dry breasts, and legs cooked to death... It is this experience which has led me tap into my wealth of food knowledge to help the every day cooks at home to prepare wonderful, perfect feasts with the least amount of hassle.

"Who IS this pompous ass?" you may ask yourself as you read. Well, let me tell you! I am an ex-chef, who after 15 or so years in the business of running big kitchens, decided to change careers a few years back. Now, I am an engineer with a 9-5 job who LOVES to come home and cook for my family and friends. I guess you can always take the chef out of the kitchen, but can never take the kitchen out of the chef.... During my cooking career, I have run several large restaurants with the premise that quality should never take a back seat, because it is just as easy to make something great as it is to make something horrible.... it is just a matter of how much you know.

My short term goal for this blog is to help all of you survive the holidays with beautiful, delicious food that can be easily prepared and turned out when your family is eagerly awaiting their feast. I would like to help you make YOUR house the place your friends and relatives can't wait to get to for supper. Additionally, I hope to be able to give some pointers for entertaining, to help make your event special while helping you keep your sanity. After we tackle the holidays (with at least a few nice fall/winter dishes sprinkled in there) we will set our sights on weeknight meals and weekend feasts.

So, without further adieu, here is how to roast a perfect turkey.....


The perfect bird should be golden brown, moist, and delicious, and should be pretty painless to do. As with anything worth doing, the most work is in the preparation, before you get down to the brass tacks of actually roasting the turkey.

Preparing the turkey:
  1. Thawing – Most of us will be getting a frozen turkey through work or from the grocery store. In order to avoid food poisoning, it is critical to thaw it correctly in the refrigerator. Just place it on a tray still in its original wrapper, and let it sit in the fridge for 3-4 days.
    1. Another technique is to brine the turkey during the thawing process. It is still done in the fridge, except you will soak the turkey in salt water. Brining will help to speed up the thawing process while concentrating the flavors of your bird while seasoning it. A 20 lb turkey thawed in 5 gallons of brine will take about 24 hours to thaw.  A proper brine solution should be about 2 pounds of salt to 5 gallons of water. Simply start off with tap water, (cold, but not ice cold) add the salt, and stir it until the salt is dissolved. Place the turkey into the solution and put it in the fridge. It is that simple. Once thawed, dry the turkey inside and out with paper towels.
  2. Once thawed, the first thing to do is find the pop up timer in the breast of the turkey. Once you found it, THROW IT OUT. Using these will almost guarantee your bird will be overcooked and will most likely suck. The reason is that these timers are based upon temperature, and pop when the temperature of the breast reaches 160 – 170 degrees, well past tasty and into the “Why Am I So Thirsty Turkey Zone.” To cook a good bird, invest in a good stick thermometer. You can get one here for under $10:


3. After removing the timer, reach into the cavity in between the legs and remove the neck. Go to the front of the turkey near the wings and remove the organ bag. Save these parts for your gravy, they will make it amazing.


4. Seasoning – This is the part of the process that is open to interpretation. Season your turkey with things you like. However, no matter what spices you use, you will need a decent quality Olive Oil. Typically I use the “Pure Olive Oil” which is a third pressing of the olives, and thus is not as rich (or as expensive) as Extra Virgin. For my turkey, I use freshly cracked pepper, sea salt, and garlic. I take about 2 cups of oil and a few tablespoons of garlic and run it through the blender to make a smooth garlic oil (do this a day ahead so the flavors have time to marry) Sprinkle the salt and pepper all over your bird, inside and out, carefully minding the “armpits” under the legs and wings. Then brush or pour some of the oil over the bird, taking care to evenly distribute the oil and garlic. Make sure to get some in the cavity as well. Once seasoned, let it sit for an hour or so before you plan to cook it. You can also do this the night before if you plan to eat early.

    1. If you are feeling frisky, get some of that oil, salt, and pepper UNDER the skin to season the meat directly. While not critical, it will make it taste a little better. However, you run the risk of your skin shrinking and your turkey looking like a leper… your call…..
5. Stuffing The Bird- Over the past few years, stuffing the bird has been considered blasé or even dangerous. The problem is, when grandma made her stuffing, she usually did it the day before so it was nice and cool to handle when she stuffed the bird. I ALWAYS stuff my turkey; it makes the stuffing better and evens out the cooking of the bird. The secret is to stuff your bird while the stuffing is still HOT. Just use a spoon, then you don’t get burned. Using the hot stuffing will not add significantly to the cooking time of the turkey, and will keep it out of the “temperature danger zone” during roasting when the nasty little buggies try to poison you. 

6. The Roasting Pan – This is probably the most important consideration to make when making your bird. Personally, I have a nice Caphalon roasting pan with a rack that I use. However, since this is something that most people will only use once or twice a year, it may be better for you to use a disposable pan. Just make sure that the sides are not too high (2-3 inches is perfect) so the heat can reach all of the bird evenly. If your pan is too deep, it will not heat the bird evenly. It doesn’t really matter what you prefer to do, just make sure you do something to get the turkey off the floor of the pan above the juices. You can put a few stalks of whole celery and a few whole carrots in the bottom to do this. The reason for getting the turkey in the air a bit is to get the juices (the water that comes out of the turkey) to evaporate rather than have the bird sit in it. If you have the bird on the floor of the pan, you lose critical surface area to get those juices evaporating, and it will just cause your turkey to cook unevenly and taste boiled on the bottom portions, which you don’t want. So, in short, get that bird out of the juice! Below is a link to the kind of pan you should look for if you don't have one.
    1. ***** UNDER NO CIRCUMSTANCES SHOULD YOU COVER THE TURKEY WITH A LID OR FOIL****** covering the bird turns your roaster into a steamer, and your turkey will be pale and nasty looking, and probably will be dry as well. 

Now, onto the roasting of the bird!


Roasting The Turkey

  1. OK, so you have your prepped turkey all seasoned, stuffed, racked, and ready to go into the oven. So now what?!?!?! OK, remember that oil we put on the turkey? We need to get that oil hot enough so that it can crisp the skin. So, to do that, preheat your oven to 450 degrees (if you have a convection oven, reduce temp by 15-20 degrees). Let your oven reach the temperature before you put the bird in, otherwise you may as well just go to Chinese Buffet. Preheating the oven is key to cooking with it, but many people simply DON’T.
  2. Once your oven is hot, put your turkey in. You will cook the bird at 450 until the skin begins browning, which will take about an hour or so depending on how big it is.
  3. After the skin begins browning, back the oven off to 325. No, you don’t have to take the turkey out. This is where the art of roasting begins. Typically a stuffed 20 lb bird will take about 4 hours. (This is a guideline, your turkey will be done when it is done, sometimes 3.5 hours, sometimes longer, just depends)
  4. Basting- Basting the turkey is a must. I usually baste mine every 30-45 minutes with the oil and garlic mixture until it is gone, then I switch to melted butter. Use a pastry or grilling brush to baste, and be quick about it. An open oven door loses about 1 degree of temperature every 7 seconds, so don’t lollygag. Get in there, baste, and get out, otherwise your oven will cool off and your bird will cook unevenly.
    1. *** Don’t use the juices in the bottom of the pan, as they will contain water. If you want crisp skin, you don’t put water on it. Water makes things soggy.
  5. When is it done?- OK, remember that thermometer I told you to buy? Make sure you read the directions and calibrate it correctly. Assuming you did that, simply stick the thermometer into the breast of the turkey until it gets close to the bone, but not touching bone. You want to stick it in the breast and again in the leg area. You are shooting for 150 -155 degrees, no more…. Typically I pull my turkey out of the oven at 150, then let it sit for 30 minutes. It is hot enough, and it will keep on cooking to finish itself with the residual heat.
    1. Light meat and dark meat are different densities and moisture content, so they will cook differently, which is why you need to check the temperature of both. Usually they will stay fairly close to each other if you use hot stuffing, but you may have a problem where the breast is done, but the legs are not. If you have this case, you have a couple of options.
                                               i.     Invert the turkey – If your bird is cooking unevenly, flip it so the breast is on the bottom. If your skin is crisp enough, it wont hurt anything, and will get your dark meat into the direct heat of the oven.
                                             ii.     Turkey en Salmis – OK fancy French term for cutting the breast off when it is done, and then finishing the dark meat on it’s own terms. Since I slice my turkey before I take it to the table, this works well. Using tongs and a boning knife, simply slide the knife along the breast cage until the breast comes off. Cut the skin by the leg and the breast should come off. Set aside, and place the carcass with the dark meat back into the over. Lay some foil over the breasts and let them sit, they will be fine.
  1. Carving the Turkey -  This is a subject that I can speak reams about, but since some people are so particular about it, I am going to make a basic recommendation and just leave it at that. Usually, I take the breasts off the carcass and slice then about ¼” thick. You will get a higher yield from your turkey if you do this, and you don’t have to worry as much about giving grandma a Harry Potter scar at the table. I lay the sliced breast (Keeping it all together when I move it) on a serving tray, and then place the legs, thighs, and other dark meat in between the two breasts. But, do what you like. There are plenty of ways to do it, look online for videos on the subject.